| Fuselian Armaments | |
| Bolo | |
| |
| |
| Tier 6 Stock | |
| Combat | Armor: 6mm Armor Class: 0 Maneuver: 5 Ammo: 700 rounds Silhouette: 40 |
|---|---|
| Trading | Cargo: 105 crates Range: 1350 km |
| Performance | Max Speed: 379 kph Stall Speed: 168 kph Acceleration: 85 kph/s |
| Misc. | Crew: 4 seat(s) CKPH: ? Corner Velocity: ? kph |
| Upgrade Slots | Combat: 6 Engine: 6 Hull: 6 Wing: 6 |
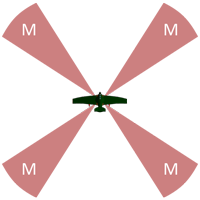
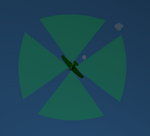
| Gun Mounts | Forward: None Rear: None Wing: None Diagonals: 4x Medium |
| Maintenance and Repair | Cost per %: Ģ 436 Time: 210 minutes |
| Disabled Maneuvers |
None |
| Price: Ģ 3,270,400 Availability: Alpha 5, Midgard, Olio,Eltsina | |
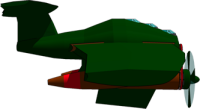
The Bolo is a heavy fighter-bomber designed by Armada technicians at the behest of Admiral Fuseli, who wanted a flexible aerial bombardment platform that could defend itself against all enemies. The classic Bolo is affectionately known as the "Hedgehog" due to the arcs of its guns, which can cover all 360 degrees of sky around the plane.
Variants[]
Bolo Mk.I[]
The Hedgehog first appeared in combat during the Civil War between Fuseli's Armada and the Commonwealth of Skytopia, and was one of the deciding factors in Fuseli's eventual victory.
Bolo Mk.II[]
The Mk.II was designed in secret prior to the Tortugan Upheaval, and first utilized in a defensive capability on the battle carrier Scarlet Blade during the battle for Tortuga. These Bolo squadrons were also used with great effect to bomb Tortuga and secure a victory for the Armada. Captured Mk.II's were sold by the Tortugan Government-in-Exile to fund reconstruction, and so entered the hands of several Skyrates, who found it to be an improvement over the Mk.I in many ways.
Recommended Loadouts[]
Flaks - "The Hedgehog"[]

For the pilot who likes a rough brawl of a fight, nothing beats a quad flak Bolo. Extended Barrels and Improved Swivel Mounts turn the Bolo into a really nasty fighter, and make the Barrel Roll significantly more threatening to large clusters of enemies, as it considerably reduces your chances of being hit whilst having no impact on your firepower. Finally, add Armour Piercing or High Explosive Rounds to taste; crit-spewing flaks are great for shredding anything that gets in your way, and are well worth the minor damage penalty - alternately, the sheer firepower boost could also prove effective, but probably not worth the crit sacrifice.
With great accuracy and skill, a Flak-loadout Bolo can crush anything that would dare cross paths with it - a cunning and resourceful pilot can train up to two of the flak cannons on certain larger targets like Avengers, and with a little luck, can bring all four to bear on larger targets like Leviathans, Barracudas and Bismarcks, annihilating them in short order. Not even those fancy schmancy 'performance' planes are safe - with +50 accuracy modifiers before accounting for skills, they have a lifespan shorter than your average CR-4P that's surrounded by a pack of Thunderbolts.
2.5 - Hedgehog Mark II[]
At first, new flaks looked to be incredibly inferior to their previous round equivalents. But not so! With the revelation that crits ignored armour class (on top of always hitting), and that flaks have a very high crit rate, the Hedgehog is still a very viable design capable of handily shredding anything it comes across. Whilst it's non-critical shots will bounce off most aircraft, it's critical rounds can achieve very high levels of damage, and it would not be infeasible for one with a good gun setup to score upwards of 300 damage in a single blast from all four guns. Whilst it can rarely bring all of that firepower to bear on a single target, lucky moments and good timing can often leave enemies reeling - lucky pilots may even be able to bring all four of their guns to bear on the Thunderbolt. Combined with a high-armour and high-armour class setup, the Mark II makes the Mark I look mostly harmless, and it makes short work of Leviathans, Barracudas and Bismarcks. The Barashiki, Lancaster and Kingfisher are also highly susceptible.
Nothing is safe from the Mark II.
Additionally, this setup can also be employed on the Hades to similar effect; though it has only two Medium mounts, its six Small mounts will make up the difference in the hands of a skilled pilot.
Longarms - "The Porcupine"[]
If outmaneuvering your enemies and taking them apart from long range is more your style, then a quad longarm setup is quite effective. Long range and high accuracy make this great against perfs (not quite as accurate as the Hedgehog, but still deadly) and most other planes, though blimps may take a bit longer to defeat. As long as you can lead them into your rear arcs, blimps should not be a problem. Extended Barrels are a must, though from there it's really up to your personal taste; Improved Swivel Mounts do not give much of a boost, so Armour Piercing and/or High Explosive Rounds are helpful, or high-quality Grease if preferred.
Notes[]
Whilst the Hedgehog is good at up close and personal fights and less effective at long range, the Porcupine excels at longer-ranged engagements - at the cost of poor combat performance at short range, especially vs blimps. Pick whichever suits your style, or even mix and match! Want Flaks in the front and Longarms in the back? Go for it.
| Planes | ||||||||||
|---|---|---|---|---|---|---|---|---|---|---|
| Type\Tier | 0 | 1 | 2 | 3 | 4 | 5 | 6 | 7 | 8 | 9 |
| Combat | - | - | Phantom | - | Seahawk | - | Vengeance | - | Hades | Avenger |
| Perf | - | - | Marauder | - | Thor | - | Loki | - | Nova | Ingersoll |
| Trade | - | - | Nomad | - | Halifax | - | Bullfrog | Leviathan | KingFisher | |
| Upgrade | CR-4P | - | Excelsior | - | Seafire | - | Barracuda | - | Dauntless | Mantis |
| Perf/Combat | - | Chapparal | - | Valkyrie | - | Mkii | - | Thunderbolt | - | Havoc |
| Combat/Trade | - | Mastiff | - | Bolo | - | Cyclops | - | Barashiki | - | Bismarck |
| Perf/Trade | - | KittyHawk | - | Requin | - | Cetacea | - | Lancaster | - | Spectre |